|
Part 5: Equipment
Rack
By now a week had
passed since I started the install, at this point I am no longer able to
take whole days to work on the project except on the weekend, so I will
no longer track my progress by days. I was able to use a whole Saturday
to get a large portion of the trunk work completed.
With the subwoofer
mounted I surveyed the trunk and remaining equipment and realize I had a
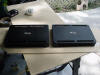
problem. The MB Quart amplifiers were really big and if I wanted to get
all the equipment in the trunk I would have to make some changes. If I
wanted to have a window view of the woofer inside the enclosure I would
have to mount either the EQ or the CleanSweep to the trunk floor,
however didn't necessarily want to do this. So in a decision I hope I
don't regret later I decided to do away with the Plexiglas window
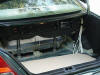
 on the
sub-box. I cut a 35-inch by 8 inch piece of MDF and made a flat panel to
cover the outside of the speaker box and a mounting location along the
top wall of the trunk for the EQ and CleanSweep. (See side bar on the
issues with connecting the CleanSweep) then bolted the two pieces in and
moved on to the amplifiers. on the
sub-box. I cut a 35-inch by 8 inch piece of MDF and made a flat panel to
cover the outside of the speaker box and a mounting location along the
top wall of the trunk for the EQ and CleanSweep. (See side bar on the
issues with connecting the CleanSweep) then bolted the two pieces in and
moved on to the amplifiers.
Early on in the
project I had cut a baffle board for the amplifiers. I did have to do a
bit of trimming now since the sub box was in, but was able to mount the
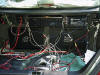
board vertically in front of the fuel tank, using L-brackets.
 This board
mounts approximately an inch away from the fuel tank, so unless I use 3
inch long screws there is no danger of drilling into it. After getting
all the pieces bolted in I was able to get an idea of how I would do the
wiring. I mounted the Streetwires fuse block to the trunk floor and ran
my power wire to each component. If you remember I ran 0 gauge from the
battery, and now I am running 4 gauge to the two amplifiers. I also run
10 gauge to the EQ and CleanSweep. I then terminate the speaker wires
and connect the four passive crossover networks that came with the Quart
midrange and tweeter sets. This board
mounts approximately an inch away from the fuel tank, so unless I use 3
inch long screws there is no danger of drilling into it. After getting
all the pieces bolted in I was able to get an idea of how I would do the
wiring. I mounted the Streetwires fuse block to the trunk floor and ran
my power wire to each component. If you remember I ran 0 gauge from the
battery, and now I am running 4 gauge to the two amplifiers. I also run
10 gauge to the EQ and CleanSweep. I then terminate the speaker wires
and connect the four passive crossover networks that came with the Quart
midrange and tweeter sets.
|
Side
Bar: CleanSweep connections
- JL Audio
recommends installing the CleanSweep after any equipment that is used
to equalize or modify the OEM signal. Based on the schematics I had on
the factory audio system I knew the best place to wire the CleanSweep
was after the factory Bose amplifier. This was also the easiest since
I could confirm all the wire colors by looking at the stock speaker
connectors in each door. The stock amplifier has outputs for Front and
Rear doors. Dash tweeters and subwoofer. I used the front and rear
door outputs in this case. I first used splice connectors for each
connection, however felt it didn't give me the best contact between
wires so ended up cutting the leads and using crimp-on butt
connectors. This gave me the connection I needed and made me more
confident that there wouldn't be a problem down the road. After making
the speaker connections I connected power, ground and ignition.
Initially I used the same wires that the factory amp got its power,
etc from... but noticed a bit of noise so ran new 10 gauge power and
ground and am now using the JL's signal sensing feature to cut things
on. When I fired the system up for the first time the rear speakers
were process perfectly, but the front portion of the JL processor;
even though EQ's set totally a flat curve was not able to tune
out all the compensation. I hope additional tweaks can solve this.
|
After making connections for speakers, I ran my RCA
cables. Since everything is in close proximity in the trunk and there is
no need to run RCA's from the front to the back of the car because of
the CleanSweep locations
 I used top-of-the-line StreetWires RCAs, none
any longer than 3 feet. I am hoping by keeping the signal path short
this will help boost sound quality. With everything connected I moved on
into testing the system. I used top-of-the-line StreetWires RCAs, none
any longer than 3 feet. I am hoping by keeping the signal path short
this will help boost sound quality. With everything connected I moved on
into testing the system.After placing the
calibration CD in the changer I setup the CleanSweep using the supplied
instructions that came with it. In less than 30 seconds, the LED's on
the top of the unit showed that all four channels were now relatively
Bose EQ-free and ready to go. My initial listening included a few tracks
from BB King and Eric Clapton (Riding with the King) and Marron 5's
album. On CD tracks the system sounded excellent, the bass was solid and
well balanced between the mids and his on both albums. The sound was
good, but I did notice some holes in several frequency ranges, but this
is common with cars tune relatively flat. Thus the need for the 31-Band
EQ, which I will tune later. For now I am demo'ing the system with only
the CleanSweep in the signal path and the PPI EQ set to defeat. On XM
Radio Channel 71 (Water Colors) I was very impress with the over all
sound quality and only found a slight degradation in sound quality from
CD. On Channel 21 (KISS) the pop music sounded great. I am not a really
big fan of rap and R&B, but on tracks with heavy bass content it was
evident that the subwoofer was capable of much more. Since this was just
an initial listen to make sure everything works I will go into more
detail later with particular songs and the methodology I use to tune the
system. But first impressions were good.
UPDATE: After living with the
system for a few days (without the PPI EQ) it is evident that a flat
frequency response as created by the CleanSweep is not ideal. As
designed the CleanSweep will give a reference point to start tuning a
system from. The time spent without the EQ in the loop was good however
and showed me several issues that needed to be addressed.
Part 6:
Tuning and System Wrap-up |


