|
Part 2: Installation
With the design portion of the project out
of the way and a good idea of how we wanted to proceed. We decided it
was time to get down to business. The first and hardest part of getting
started was finding a time to actually do the installation. One problem
with doing such an installation in north Florida in August is it is so
darn hot, not to mention my shop isn't cooled. So a decision was made to
wait until early fall, or until cooler weather. The other factor was my
day job. As much as I'd like to do nothing but play with cars all day
long, I have to pay the bills some how. Lucky for me, the Corporate marketing/
lobbying work I do isn't as demanding in the fall as it is in
the spring when Florida is in it's annual legislative session. After
reviewing the calendar, and the weather reports I decided to take a four
day weekend in early October when the temperature is more predictable
and I can be assured it won't rain on me if I need to move outdoors for
part of the install.
Day 1
In starting this project and write
up of
it, I will assume that most readers fall into two camps. Those who are
looking to do the same, and those just curious as to what steps I took
to get the system put together. In either case, I will not go into a lot
of detail on the preparation for the project, and assume that my readers
have a basic understanding of car audio. As in any project
good, well thought out planning and organization is important. I can not
stress enough, "the right tools for the right job" and related sayings
have never been so true as in a project for this. So if you are taking
on an install of this nature, plan ahead, invest both the time and even
the money and get everything you need before you start. On a multiply
day project like this, you do not want to be driving to the parts store
50 times. That being said, lets get started.....
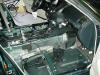
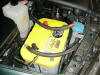 On Day 1, I first
decided to tackle the power delivery system in the Infiniti. My vehicle
came with a 600 CCA Interstate battery, which would have been fine for
this application, On Day 1, I first
decided to tackle the power delivery system in the Infiniti. My vehicle
came with a 600 CCA Interstate battery, which would have been fine for
this application,
 but
over the years I have learned that when upgrading an audio system, you
can not have enough power, not to mention if you plan on listening to
your system at all with the engine off a deep cycle battery is a must.
Longer periods of time than say fifteen minutes I would recommend
looking into a second battery even. I like the
Optima Yellow top Batteries. I use the D34 with it's dual post. It
is only rated at 750 CCA, but the deep cycle technology allow it to be
run longer and its power is cleaner with higher voltage output than
conventional batteries. Also, the dual post properties make wiring an
audio system much easier. In this case, however I had a neat little
addition called the
Tsunami
Battery Topper, which didn't require the use of secondary post. The
battery topper allows you to connect the factory power connections on
one side and your audio on the other. Along with making connections nice
and neat, the Battery Topper h but
over the years I have learned that when upgrading an audio system, you
can not have enough power, not to mention if you plan on listening to
your system at all with the engine off a deep cycle battery is a must.
Longer periods of time than say fifteen minutes I would recommend
looking into a second battery even. I like the
Optima Yellow top Batteries. I use the D34 with it's dual post. It
is only rated at 750 CCA, but the deep cycle technology allow it to be
run longer and its power is cleaner with higher voltage output than
conventional batteries. Also, the dual post properties make wiring an
audio system much easier. In this case, however I had a neat little
addition called the
Tsunami
Battery Topper, which didn't require the use of secondary post. The
battery topper allows you to connect the factory power connections on
one side and your audio on the other. Along with making connections nice
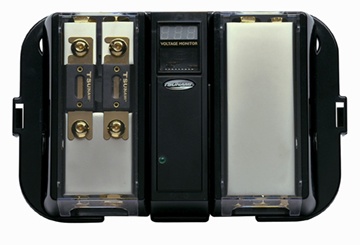
and neat, the Battery Topper h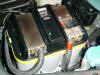 as a power gauge on the top that gives you
a read-out of the voltage you system is putting out. From the
business-side of the optima I connected a Streetwires, 0 gauge (AWG -
American Wire Gauge) power cable. The hardest part about this portion of
the installation was finding a place to run the garden-hose sized cable
into the passenger compartment and on to the trunk. I had purchased a Streetwires cable grommet to use with the cable, but ended up finding a
hole already in the firewall just above the steering column. I also
connected an 0 AWG ground wire to the chassis just below the battery to
insure proper grounding of the system. Both wires were wrapped in nylon
braiding and heat wrapped at the ends for protection from the elements,
as well as cosmetic purposes. as a power gauge on the top that gives you
a read-out of the voltage you system is putting out. From the
business-side of the optima I connected a Streetwires, 0 gauge (AWG -
American Wire Gauge) power cable. The hardest part about this portion of
the installation was finding a place to run the garden-hose sized cable
into the passenger compartment and on to the trunk. I had purchased a Streetwires cable grommet to use with the cable, but ended up finding a
hole already in the firewall just above the steering column. I also
connected an 0 AWG ground wire to the chassis just below the battery to
insure proper grounding of the system. Both wires were wrapped in nylon
braiding and heat wrapped at the ends for protection from the elements,
as well as cosmetic purposes.
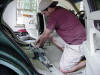
After getting my power needs taken care of,
I moved to the interior of the car. In the past I have done
installations both with the interior components intact, and with them
removed. It is much more labor intensive to remove everything, but it
allows you to do a better job of running wires and gives you better
access to
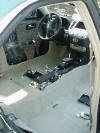 the
various nooks and crannies in a car. Thus I chose to pull the whole
interior of the "M". This process took several hours, but again was
worth the pay off. I was able to run all my speaker and power wires as
well as work in the interior of the car with out fear of messing-up
interior parts, or getting them dirty. Once the interior was out, I ran
four sets of 14/4 (14 Gauge/ 4 conductors in one single cable) speaker
wire. I used Monster Cable's in-wall home theater cable for this, since
it is readily available and is a good quality wire. The reasons for 4
conductor wire will be evident when we get to speakers. Each wire run
was pulled to one of the four doors of the Infiniti and was again
braided using the same nylon braiding we used under the hood. Also, each
end was terminated with a wire boot which ensures a good weather proof
seal on the ends. In addition to the 14/4 wire, I the
various nooks and crannies in a car. Thus I chose to pull the whole
interior of the "M". This process took several hours, but again was
worth the pay off. I was able to run all my speaker and power wires as
well as work in the interior of the car with out fear of messing-up
interior parts, or getting them dirty. Once the interior was out, I ran
four sets of 14/4 (14 Gauge/ 4 conductors in one single cable) speaker
wire. I used Monster Cable's in-wall home theater cable for this, since
it is readily available and is a good quality wire. The reasons for 4
conductor wire will be evident when we get to speakers. Each wire run
was pulled to one of the four doors of the Infiniti and was again
braided using the same nylon braiding we used under the hood. Also, each
end was terminated with a wire boot which ensures a good weather proof
seal on the ends. In addition to the 14/4 wire, I
 also
ran a pair of Monster 16/2 gauge wires to the dash which will later be
connected to our extra pair of tweeters in the dash locations. After
pulling the cables, I moved to installing my speakers. Up front I am
using a set of MB Quart Reference Series 6x8's (RCE-268) components sets
in a coaxial configuration. This setup takes the normally separate
Mid-range and tweeter and allows you to mount the tweeter above the cone
of the mid-woofer. The factory speakers are 6.5-inch dual cones, but
they fit into an irregular opening and custom baffles had to be made to
hold the speakers. I cut these baffles from 1/2-inch MDF and covered in
sound deadening material and screwed them into the doors. I then simply
dropped the speakers in the opening and connected them up. One pair of
the 14 gauge multi-conductor speaker wire to the mid the other to the
tweeter also
ran a pair of Monster 16/2 gauge wires to the dash which will later be
connected to our extra pair of tweeters in the dash locations. After
pulling the cables, I moved to installing my speakers. Up front I am
using a set of MB Quart Reference Series 6x8's (RCE-268) components sets
in a coaxial configuration. This setup takes the normally separate
Mid-range and tweeter and allows you to mount the tweeter above the cone
of the mid-woofer. The factory speakers are 6.5-inch dual cones, but
they fit into an irregular opening and custom baffles had to be made to
hold the speakers. I cut these baffles from 1/2-inch MDF and covered in
sound deadening material and screwed them into the doors. I then simply
dropped the speakers in the opening and connected them up. One pair of
the 14 gauge multi-conductor speaker wire to the mid the other to the
tweeter
 on
each side of the car. In the rear I used a set of MB Quart (RCE-216)
6.5-inch component set mounted the same way, like the fronts the factory
Bose speakers were 6.5-inch, but the cut outs were irregular and a
baffle had to be fabricated. The MB Quart Reference series is Quarts
main line of speakers. They do offer a Premium line and their top of the
line Q-series, however for the money I chose the Reference series. At
$339 a pair for the RCE-216 the Reference series isn't cheap, but when
you compare that to the $1200 retail of the Q-series, they are a
bargain. on
each side of the car. In the rear I used a set of MB Quart (RCE-216)
6.5-inch component set mounted the same way, like the fronts the factory
Bose speakers were 6.5-inch, but the cut outs were irregular and a
baffle had to be fabricated. The MB Quart Reference series is Quarts
main line of speakers. They do offer a Premium line and their top of the
line Q-series, however for the money I chose the Reference series. At
$339 a pair for the RCE-216 the Reference series isn't cheap, but when
you compare that to the $1200 retail of the Q-series, they are a
bargain.
By the end of day one, I had made good
progress. I had installed and connected a new battery with cables,
completely gutted the interior of the "M" and installed our door
speakers and run the appropriate wires to the trunk all in about 8
hours. The longest part of this process was in fact hunting for the best
method to get the power cable to the trunk and pulling the interior.
Not bad for 8-hours.... Tomorrow would begin the hard part, designing and fitting a custom
subwoofer enclosure in the trunk.
----------------------------------------------------------------------
Day 2: Subwoofer
Enclosure
|


