|
and then line
the rest of the trunk with a plastic drop cloth to protect everything
from flying fiberglass. Next I put on rubber gloves and a painters nose
mask to keep out the fumes of the resin. I then mix the resin in a small
plastic
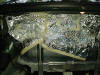 dish and proceed to brush the mixture onto the foil. After I get
the foil coated with resin I lay out a layer of fiberglass matting over
the wet resin, I then brush additional resin on top to completely soak
the matting. I then let it dry for several hours. I repeat this process
three more times before removing the enclosure from the vehicle. The
remainder of the subwoofer enclosure build-up takes place over multiply
days, since drying time for the fiberglass resin takes anywhere from
4-12 hours per coat depending on thickness. The first day I am only able
to get two coats done and then allow the box to dry for a good 14 hours
before applying a third. dish and proceed to brush the mixture onto the foil. After I get
the foil coated with resin I lay out a layer of fiberglass matting over
the wet resin, I then brush additional resin on top to completely soak
the matting. I then let it dry for several hours. I repeat this process
three more times before removing the enclosure from the vehicle. The
remainder of the subwoofer enclosure build-up takes place over multiply
days, since drying time for the fiberglass resin takes anywhere from
4-12 hours per coat depending on thickness. The first day I am only able
to get two coats done and then allow the box to dry for a good 14 hours
before applying a third.
The remainder of day two is filled up with reassembly of parts of the
interior which I no longer need access to. The carpet, front seats and
front door panel are all replace and I reconnect the battery and start
the car to make sure all is reconnected correctly.
During the remaining days of the install, I will continue with the
subwoofer enclosure and start wiring up our CleanSweep and build the
amplifier and equipment racks.
Day 3
On Day three, after
letting our enclosure dry overnight I remove it from the vehicle.
This is were the aluminum foil pays off. Other than getting the single
sided enclosure over a few wires it pops right out.
CAUTION: During the enclosure part of the install
and related you must remain constantly aware that you are working near
and on top of a fuel tank. Make sure you do not accidentally pull or
loosen any connectors to the fuel pump or other connections, and never
drill or attach anything near it with screws which could penetrate the
tank.
With the enclosure out
of the vehicle we can see that after three layers of fiberglass it is
between 1/8 and 5/16 of an inch thick. Our goal is roughly 5/16 inches
thick, but more importantly it must be completely sealed. As of now, we
only have a single side of the box completed, the fun part will be
getting the rest of the box built.
The next step is to
build the remaining walls of the enclosure. I have found over the years,
the best method is using grill cloth or a nylon cloth to warp the
enclosure. I usually staple the cloth around the open part of the box
and pull it tight, then apply a coat of fiberglass resin to harden it.
After that, I lay several coats of matting down for strength. This
process usually
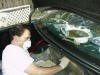 takes
a bit longer since drying time is usually slower with the grill cloth,
than the matting. In this case I had to add a wooden support along the
middle of the boxes outter wall, one for added support two to have
something to staple the grill cloth too. Over the next two days I apply
a total of four more layers of fiberglass both inside and out to get a
totally sealed enclosure. I then let the box cure for an additional day
to make sure it is solid. On days 4 and 5 of the install I will apply
Bondo to the outside of the enclosure and sand it to get a smooth outer
finish. But more on that later. takes
a bit longer since drying time is usually slower with the grill cloth,
than the matting. In this case I had to add a wooden support along the
middle of the boxes outter wall, one for added support two to have
something to staple the grill cloth too. Over the next two days I apply
a total of four more layers of fiberglass both inside and out to get a
totally sealed enclosure. I then let the box cure for an additional day
to make sure it is solid. On days 4 and 5 of the install I will apply
Bondo to the outside of the enclosure and sand it to get a smooth outer
finish. But more on that later.
The
 remainder of day
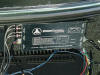
three was used to let our fiberglass dry. During this time I worked
through the wiring in the trunk were the factory Bose Amplifier/
Processor is mounted to find the correct wires to splice into for the CleanSweep. The time spend here will pay off in the long run and prevent
having to come back and rewire things. After connecting the front and
rear speaker leads from the output of the Amplifier to the inputs
of the CleanSweep, I tapped in to Power, Ground and Ignition wires to
power the CleanSweep. (See side bar on part 5) I wrapped both of these wires in split loom and
left them hanging in the trunk for our next steps. remainder of day
three was used to let our fiberglass dry. During this time I worked
through the wiring in the trunk were the factory Bose Amplifier/
Processor is mounted to find the correct wires to splice into for the CleanSweep. The time spend here will pay off in the long run and prevent
having to come back and rewire things. After connecting the front and
rear speaker leads from the output of the Amplifier to the inputs
of the CleanSweep, I tapped in to Power, Ground and Ignition wires to
power the CleanSweep. (See side bar on part 5) I wrapped both of these wires in split loom and
left them hanging in the trunk for our next steps.
----------------------------------------------------------------------
Part 4: Subwoofer wrap-up
|


