|
Part 4: Subwoofer
Wrap-up
On day 4 of the
install, due to career obligations I was not able to dedicate much time
to the installation, however I was able to apply a fifth coat of
fiberglass to the outside of the enclosure. This brought the width of
the box up to about 3/8 of an inch in some areas and put us in the
posture to applying the Bondo and smoothing the rough edges out.
On the fifth day I
spent most of my time driving around looking for several parts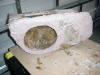 that I realized I needed after I made a couple deviations from the
original plan (see Side Bar on Part 3 of install). One item was 1/2 " or
thicker Plexiglas for the viewable window I had decided to add to the
back of the enclosure. This window would provide a view of the massive
magnet structure of the subwoofer from the trunk and with the addition
to a light, add some interest and custom features to the install.
Unfortunately after hitting the local hardware stores who sell plexi',
along with a couple glass shops. All either didn't have the correct
thickness, or were way, way to expensive. So I decided to order a small
6"x12"x1/2" piece online. Even after paying for two-day delivery it was
cheaper than the local glass shops. The other item I needed was sand
colored grill cloth to match the cloth on the grill over the subwoofer
on the rear deck. I decided to remove the Bose logo, but when I did it
left two ugly holes were it mounted to the grill. Recovering will fix
this, but I had to track down the correct color.
that I realized I needed after I made a couple deviations from the
original plan (see Side Bar on Part 3 of install). One item was 1/2 " or
thicker Plexiglas for the viewable window I had decided to add to the
back of the enclosure. This window would provide a view of the massive
magnet structure of the subwoofer from the trunk and with the addition
to a light, add some interest and custom features to the install.
Unfortunately after hitting the local hardware stores who sell plexi',
along with a couple glass shops. All either didn't have the correct
thickness, or were way, way to expensive. So I decided to order a small
6"x12"x1/2" piece online. Even after paying for two-day delivery it was
cheaper than the local glass shops. The other item I needed was sand
colored grill cloth to match the cloth on the grill over the subwoofer
on the rear deck. I decided to remove the Bose logo, but when I did it
left two ugly holes were it mounted to the grill. Recovering will fix
this, but I had to track down the correct color.
Finally at the end of
the day on Day 5, I was able to get the enclosure all sanded smooth and
apply the first coat of Bondo to select areas. Bondo helps fill in any
cracks and along with helping to make sure the box is sealed, helps
smooth the transitions between panels and makes the enclosure look like
one flowing part.
After allowing the
enclosure to completely cure and dry over night, I went ahead and
mounted it. I did need to do a small amount of additional sanding to
make it fit over the wiring harnesses on the fuel tank, since the final
coat of fiberglass added about a 16th of an inch to the outside of the
enclosure. Other than that it fit perfectly. I then moved to mounting
the woofer which proved to be the trickiest part of the install. The was
due to the fact that there was a small gap between the enclosure mounted
to the bottom of the rear deck and the subwoofer mounted to the top and
made getting an airtight fit near impossible. I went ahead and made a
baffle board to mount the woofer to, then tried to fiberglass it to the
rear deck, but this proved impossible due to the slant of the rear
window. So I ended up mounting the baffle board as is and using
expanding foam to seal the spaces. This worked great and gave me a 98%
sealed space. (I say 98% b/c I don not see the enclosure being 100%
sealed). Note: The use of a baffle board proves to
be a problem later when reassembling the rear deck, since it make the
woofer to tall to fit below the stock grill, I address this later and
end up reworking the baffle concept.
With the woofer
mounted and box installed it is time to move on to the final stage of
installation, the equipment rack.
Part 5: Equipment Rack
|


